Hybrid water heaters are gaining popularity in Texas and all across Austin and San Antonio. This type of water heater combines the best aspects of conventional tank water heaters with the benefits of tankless water heaters. They offer cost savings through energy efficiency, and you never have to worry about running out of hot water! One of the only downsides of a hybrid water heater is their upfront cost – but we want to explain the benefits that you’re paying for.
The master plumbers at Reliant Plumbing have put together this page to help you understand the costs involved if you choose to hire a licensed plumber for your project. All pricing on this page is based on average prices we see around Austin and San Antonio over the last few years. Your costs will vary depending on the price of plumbing labor and supplies in your local area.
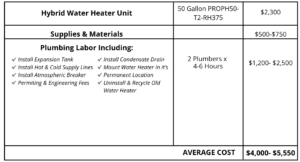
Cost to Install a Hybrid Water Heater
The average cost to have a licensed plumber install a hybrid water heater is about $5,550 – based on prices in the Austin, Texas area from 2020. Prices may have changed slightly due to inflation. See the table below for the breakdown:
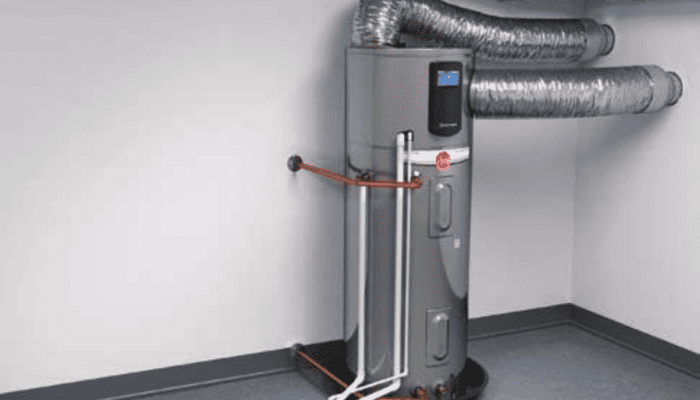
Hybrid models are only electric. You may incur some additional costs to transfer it over to electric, only if your existing water heater setup is designed for gas. If this is the case for your home, you’ll need to cap off existing gas lines. Additionally, also hire an electrician to be sure your breaker is property sized & set up for a hybrid water heater.
The other factor that can impact the price of an install is the water heaters location in the house. Hybrids are often installed in a garage or attic. It is much more expensive to move the location of you water heater & run new water lines from the water heater to the fixtures in your house.
Cost to Replace a Hybrid Water Heater
Replacing an existing hybrid water heater is cheaper when the existing hybrid connections are in place. However, these water heaters should last 13+ years without needing to be replaced. If your hybrid water isn’t that old yet, you should probably contact a licensed plumber to diagnose the reason why it isn’t properly working. Often, you can replace parts or repair leaks in supply lines without needing to replace the entire water heater unit.
The average cost to have a licensed plumber install a hybrid water heater is about $5,550 – based on prices in the Austin, Texas area in 2020. Prices may have changed slightly due to inflation. See the table below for the breakdown:
How to Get an Estimate
It’s difficult to guess the price of plumbing projects because every home varies greatly. Often, we get on a job and find the existing plumbing needs to be brought up to code before we can even get started. You should always discuss pricing with your plumber up front. They come visit your house to evaluate your project & provide an estimate. We do have a visual diagnostic fee, because they often need to diagnostics of your home before getting to a price. However, the fee is completely waived with acceptance of an estimate from Reliant Plumbing.
If a plumber is not able to provide you with an upfront estimate, you should still discuss pricing. Do they charge for labor hourly or use flat rate pricing? If they charge hourly, you might want to call a few different plumbers to compare rates. We operate on flat rate pricing, so you do not have to worry about hourly rates!
If you’re in the Austin area, we’d love to help you with your hybrid style water heater install! Contact us here to discuss your project.


Schedule Your Service
Our plumbing experts are available to take care of your repair today. They’ll evaluate your problem, provide a solution & upfront price, and then get to work!